My audience responds, "Hi! Joanne."
I started with, "I am a cookie-holic. It started when I was but a wee one in my homeland. Mommy baked for her six little ones and we ate anything and everything that she baked. Baked, here, is the key word. Baked like Paula Deen bakes. Ingredients had to include sugar, butter, vanilla and may include yeast, flour, salt, cinnamon, dried fruits, fruits of any kind, and then baked. Mom could get the most "bake for her dough" with cookies. With six kids, one pie did not go very far, but cookies she could try to control the amount eaten at one sitting. We lived on cookies, because my youngest brother and I only ate cookies. Vegetables were not for the two of us. No way we would eat them. Everyone left the table and there sat David and I with a plate of vegetables. By 9 PM we were still there with our plates. No cookies for us for dessert, straight to bed. We lived for cookies. We never learned to eat our veggies, but we did learn how to make it look like we ate them. All for the love of cookies."
NEWSFLASH
This just in from Roadfood.com. Friday, December 4 is National Cookie Day! I did not know there was such a holiday! It's a holiday for me. I am a member of a twelve step program, "cookies R us". Having been through the program more times than I can remember I never finished. I can not give up cookies. Although I can stop for periods of time, I can not give up cookies. There are no cookies in my house right now! OOPS, there are some in the freezer! they're from last Feb-GS cookies! Friday, Dec 4 is my day. I will be baking--hmmmm, what kind? who will I share them with? DH will not be home! OOOO More cookies for me. I'll go call my grand daughters. They love cookies, too. Unlike me, however, they love their veggies. Now, the truth--when I got married, the two of us only ate two veggies, corn and green beans, cut green beans, no string beans for us.. Now, John and I eat almost any color, any variety of vegetable. I still don't get any cookies til I clean my plate, though.
Monday, November 30, 2009
Sunday, November 29, 2009
Dave
This is a technique that I learned from Club Scrap. The instructions and materials were in a kit that I cannot remember the name of at this moment. It's fun and doesn't take too much time, except for letting the adhesive dry. I went to my scrap folder and pulled all the
pieces that were in the yellow/orange file. Then went to the red pieces for a coordinating color-CCrisp.
I put my mosaic together and here's what happened.
pieces that were in the yellow/orange file. Then went to the red pieces for a coordinating color-CCrisp.
ED: This 'Pieces" accordion file was found here at Paper Pleasing Ideas. Julie has great tutorials, she has a fantastic blog!
I put my mosaic together and here's what happened.
RX
Stamps-Cute and Curly, Justrite for Dave
Paper-Cranberry Crisp, Marigold Morning, So Saffron, More Mustard, Groovy Guava, Apricot Appeal
Ink-Cranberry Crisp
Tools- Curly Label punch, paper piercer, small oval punch (Dave)
Hardware- Pewter HodgepodgeI had written a little note to Dave on the inside, so I can't show it, sorry!
I added the extra piece from the front to the inside with a journaling piece that I sponged in C. Crisp.
My prayer today is may all those traveling do so with God's speed and His blessings!
Hope everyone had a happy and healthy Thanksgiving weekend.
Thanks for coming by!
Saturday, November 28, 2009
paper or plastic?
Made this card some time back. Loved it, hoarded it (of course), kept it close and came across it last week. It's been sitting on my desk and I thought I would share it with you. Way back in 2007 I received this stamp set-Double-Line Doodles from SU at a regional seminar in Tampa. I went with a demonstrator so I got this set for free!!!
Then I saw this slider card, aka push pull card. It was easier than it looked and I remember one of the 'tools' needed was a plastic shopping bag. That hooked me right in---I have plenty of shopping bags, esp. in plastic. But I wanted it to be white for my card and white it was. Since I made this card so long ago I am going to send you here to SCS see how easy it can be. I made the card, initially, without even considering decorating it. (I do that frequently.) But all turned out well and good.
Two views- one-the front and closed. The second- open. You pull on the little tab on the left and both sides emerge in sync.
Accessories- circle punch, ribbon, plastic shopping bag, recycled dimensionals, Aqua painter
Then I saw this slider card, aka push pull card. It was easier than it looked and I remember one of the 'tools' needed was a plastic shopping bag. That hooked me right in---I have plenty of shopping bags, esp. in plastic. But I wanted it to be white for my card and white it was. Since I made this card so long ago I am going to send you here to SCS see how easy it can be. I made the card, initially, without even considering decorating it. (I do that frequently.) But all turned out well and good.
Two views- one-the front and closed. The second- open. You pull on the little tab on the left and both sides emerge in sync.
RX
Paper- GP white, Barely Banana, Cool Caribbean, Pumpkin Pie
Stamps- SU Double-Line Doodles
Ink-Barely Banana, Cool Caribbean, Pumpkin Pie Accessories- circle punch, ribbon, plastic shopping bag, recycled dimensionals, Aqua painter
Go ahead, make a slider card. You will love it!
Thanks for coming by!!
It's The Last One
Ed note: We bought pogo sticks for the two children. The four year old needed a smaller one and the 6 year old did not like it. They both were returned to the store on Friday, January 1, 2010.
What do they call the Saturday after Black Friday? Does it have a name?
I know where the term Black Friday came from!
Well I did not shop on Friday, but DH and I went out today for a short fast trip. There was a very special price on a very special present from 7 AM til 12 noon at a store one mile from our home. At 11:15 I remembered that I needed to go to that store. Hollered up to DH, that we needed to go now and he said, "Give me a minute." Well, twelve minutes later we said, "Oops, we gottta go now!" Ran in to the toy dept and they had one remaining. PINK! While DH spots another one in a different model and color he says, "There's no way that will be the same price as the PINK one. It's way more expensive!"
Meanwhile, a nice man, younger than us, but not by much, comes up and wants to know where I got that PINK toy. "IT WAS THE LAST ONE", I said to him, "But there is another make and model here."
He said, "But I need pink for my daughter!"
Well, DH says there is a price checker machine right there. Go see how much that big one is? Price checker: exact same price as the PINK one. DH says, "Let's get two. One for a girl and one for a boy."
In disbelief, I do not want to let go of the PINK one. IT'S THE LAST ONE.
I said to the younger man, "We need to go get in line right now while the price is still good. Go get in line with us and we'll hand you the PINK one if the others are the correct price." I needed time to think this through!
DH says, "Just give him the PINK one. The boy and girl need to have the exact same thing so there will be no quarreling!" Reluctantly, I decided DH was right and I LET GO OF THE PINK ONE. The younger man was so in shock that we handed it over he took that box and ran. Now that I'm thinking about it he never said thanks. Or I didn't hear him. DH and I just chuckled. It felt good to give someone something that they wanted for their child. But all was not well. As we are walking to the checkout-- I was having second thoughts of giving up the PINK one. My heart was racing, head was throbbing, my knees were weak, psoriasis was acting up, and I'm practically in kidney failure. I could hardly breathe--I gave up the pink one. Not only was it pink, it was the Hannah Montana model and now it was gone, gone, gone. I'm in shopper mode! What have I let my DH talk me into? Why did I let it go? Just as I'm ready to tell DH to dial 911.....
He says, "The PINK one's weight limit was 60 pounds and the bigger more expensive one's weight limit is 100 pounds. Now, I am happy the PINK one is gone!!!!
Cancel 911, I feel better.
Well almost.......
We need to get to the cash register, quick!
For the special price.
In less than 30 minutes from the time we pulled out of our driveway, we had two toys at the same price as the PINK one and my husband no longer had to be shopping on the Saturday after Black Friday! He's a happy man.
Well almost.......
However, I found myself looking for that younger man-the younger man withthe my the pink toy!
Our boy grandchild wouldn't care if his toy is pink. He's used to hand-me-down toys. The pink one would have been perfect for him. PINK, what was I thinking?
Let it go!!!
Do you see why I don't shop on Black Friday? OR no-name Saturday?
I can't handle the crowds, the pressure of the sale, the look on another person's face that says, "Do you want that?" OR "I have a little girl at home that needs that in pink." OR "My wife said don't come home without it."
The person that remembered at the last minute that he/she needed to be in that store by 12 noon for the special price--
just like us.
If my husband had not been there to talk sense to me I don't know that I would have made a sensible purchase. So right now, I am thankful that he was there to see what I could not.
We came home, made lunch, ate, and started a huge pot of turkey vegetable soup from the carcass on Thursday.
The kids came by at dinner time and we fed them soup. Gave half the pot of soup to the DS and family.
On this no-name Saturday we learned to share our toys and our soup. So many things to be thankful for this holiday season.
BTW, All my shopping is done. Well almost....I have two more gifts to buy--then I'm done. Well almost...
I almost forgot DH... what will I buy him....it's gotta be online!!
What do they call the Saturday after Black Friday? Does it have a name?
I know where the term Black Friday came from!
Well I did not shop on Friday, but DH and I went out today for a short fast trip. There was a very special price on a very special present from 7 AM til 12 noon at a store one mile from our home. At 11:15 I remembered that I needed to go to that store. Hollered up to DH, that we needed to go now and he said, "Give me a minute." Well, twelve minutes later we said, "Oops, we gottta go now!" Ran in to the toy dept and they had one remaining. PINK! While DH spots another one in a different model and color he says, "There's no way that will be the same price as the PINK one. It's way more expensive!"
Meanwhile, a nice man, younger than us, but not by much, comes up and wants to know where I got that PINK toy. "IT WAS THE LAST ONE", I said to him, "But there is another make and model here."
He said, "But I need pink for my daughter!"
Well, DH says there is a price checker machine right there. Go see how much that big one is? Price checker: exact same price as the PINK one. DH says, "Let's get two. One for a girl and one for a boy."
In disbelief, I do not want to let go of the PINK one. IT'S THE LAST ONE.
I said to the younger man, "We need to go get in line right now while the price is still good. Go get in line with us and we'll hand you the PINK one if the others are the correct price." I needed time to think this through!
DH says, "Just give him the PINK one. The boy and girl need to have the exact same thing so there will be no quarreling!" Reluctantly, I decided DH was right and I LET GO OF THE PINK ONE. The younger man was so in shock that we handed it over he took that box and ran. Now that I'm thinking about it he never said thanks. Or I didn't hear him. DH and I just chuckled. It felt good to give someone something that they wanted for their child. But all was not well. As we are walking to the checkout-- I was having second thoughts of giving up the PINK one. My heart was racing, head was throbbing, my knees were weak, psoriasis was acting up, and I'm practically in kidney failure. I could hardly breathe--I gave up the pink one. Not only was it pink, it was the Hannah Montana model and now it was gone, gone, gone. I'm in shopper mode! What have I let my DH talk me into? Why did I let it go? Just as I'm ready to tell DH to dial 911.....
He says, "The PINK one's weight limit was 60 pounds and the bigger more expensive one's weight limit is 100 pounds. Now, I am happy the PINK one is gone!!!!
Cancel 911, I feel better.
Well almost.......
We need to get to the cash register, quick!
For the special price.
In less than 30 minutes from the time we pulled out of our driveway, we had two toys at the same price as the PINK one and my husband no longer had to be shopping on the Saturday after Black Friday! He's a happy man.
Well almost.......
However, I found myself looking for that younger man-the younger man with
Our boy grandchild wouldn't care if his toy is pink. He's used to hand-me-down toys. The pink one would have been perfect for him. PINK, what was I thinking?
Let it go!!!
Do you see why I don't shop on Black Friday? OR no-name Saturday?
I can't handle the crowds, the pressure of the sale, the look on another person's face that says, "Do you want that?" OR "I have a little girl at home that needs that in pink." OR "My wife said don't come home without it."
The person that remembered at the last minute that he/she needed to be in that store by 12 noon for the special price--
just like us.
If my husband had not been there to talk sense to me I don't know that I would have made a sensible purchase. So right now, I am thankful that he was there to see what I could not.
We came home, made lunch, ate, and started a huge pot of turkey vegetable soup from the carcass on Thursday.
The kids came by at dinner time and we fed them soup. Gave half the pot of soup to the DS and family.
On this no-name Saturday we learned to share our toys and our soup. So many things to be thankful for this holiday season.
BTW, All my shopping is done. Well almost....I have two more gifts to buy--then I'm done. Well almost...
I almost forgot DH... what will I buy him....it's gotta be online!!
Friday, November 27, 2009
Simply Gold
This card was easy-peasey with a gold embossed angel and sentiment.
I was over at Laurie Schmidlin's blog and I got the idea from her. Her card was truly only one layer and looked so nice. One layer is out of my comfort zone, but I can learn to adjust once in a while.(Even though the sentiment is two layers, I consider this essentially a one layer card.)
Getting this angel's picture was not easy. It took a little practice to get the lighting correct. Then I found out that I did not have the memory card in my camera. Phooey! Had to take it over again. I'm going to go edit her, and flip flop her around because I want her to face the opposite direction.
RX
Paper- Elegant Eggplant from SU; gold scrap from the anniversary card in Oct 09
Stamps- Punches Three from SU; Christmas Silhouettes from Inkadinkadoo
Accessories- scalloped square punch from SU; scalloped square Nestie from Spellbinders
Technique-heat embossing using gold, fine detail, EP from Stampin' Up
Thanks for coming by!
Black Friday
I did not shop today! I had plans for four o'clock this morning to meet up with some girlfriends, but I decided at 3:45 AM not to go. There really wasn't anything I needed to buy and I would have ended up buying myself something that I did not need. i tried looking around on the internet, but nothing caught my fancy. I spent time on the phone, at my computer, at my desk-making a birthday card for a four year old. After I leave a comment at Justrite Stamps, I am heading back to make a card for you. I want to post the four year old's card, but I don't want his mom to see it in advance. So, you will have to wait about two weeks as his b-day is on Dec 29th. let's just see if it makes it in the mail early!! I am so bad about sending the cards out. I make them and then, well you know the rest. I've even heard some of you complain about the same thing. See you back here in a jiffy.
Thursday, November 26, 2009
Happy Thanksgiving
I am thankful for being here to celebrate with family and friends.
However, I did not make a turkey day card. I don't have a turkey!!!
The DSP from SU is the reverse side of the stripe one from 11.24.09, Stampin Up's Nouveau Chic.
You should see the sparkle IRL! The flourish is from Quickutz. Once again, here's my Cuttlebug embossing folder trick that I used yesterday and then stamped with my horizontal stamper from Justrite.
Thanks for coming by!
Wednesday, November 25, 2009
Cuttlebug Tutorial
Yesterday there was a tidbit on how to cut out your chipboard for an oval to use in this tutorial. If you don't have chipboard cut your oval or whatever shape out of a cereal box, cracker box,etc. You will need to cut two and glue/paste them together to get the thickness required. Cut out your shape first and then match them up so you don't have to use a craft knife to get all the way through. The die cut shape you choose should go all the way through one layer of a cereal box. Ready?
Put your cs in the embossing folder, place the oval frame over the folder, and sandwich between the A and C plate.
Run it through the bug.
Cuttlebug embossing folder 'Floral Fantasy' was used with the pink paper.
My version with the strips of chipboard:
I used the mesh embossing folder for this one in Certainly Celery.
Tammi has a great video on this tutorial which includes her water color technique, also. I found Tammi through a forum at SCS about embossing. She used a Big Shot instead of the Cuttlebug.
Splitcoast Stampers is a valuable site for all kinds of ideas. It's easy to get around their site and plenty of fantastic people if you need help.
Pearlycat, I hope you enjoyed this as much as I did doing it for you.
Send me your email so I can contact you and I'll send you a template.
Thanks for coming by!
NEWSFLASH !!!! I just cut ovals out of 5 pieces of SU cardstock, 'snailed' (taped) them together and it made a perfect thickness to get the right effect. Four pieces worked but 5 was the 'charm'. I used two sheets of Confetti Cream for those of you who 'need to know'. You know who you are!! teehee
Second newsflash!!! Started a load of laundry, emptied the detergent box....woohooo! The box is the most perfect piece of 'chipboard'. Two layers, equal thickness, my CM cutting system would not cut all the way through, but it was much better than the chipboard I started with. Used the finger cutting blade on a piece of glass and, Voila! When I make a template with a Nestie scallop oval I will definitely use the 4-5 pieces of cs since that will go all the way through each piece. When I fix dinner Wed nite I'll be sure to not use any foods that are in a box!!!!!!! Say goodnite, Gracie...................
Tuesday, November 24, 2009
Mojo Monday week 114
When I saw this challenge I knew right away that it was something I had to do. The cards that are on that site are gorgeous! Go see for yourself here. Am I the only one that created a landscape version of this sketch? I have to post it right now since I already linked it on Mojo's site. Major bummer, now I need to make a card for Thursday in advance. I will have no time to create in Cardology world on Thanksgiving. DH and I are chief cooks and bottle washers this year. He loves to cook the big turkey dinner and I love to bake. We do all the work on Thursday morning and this year we are eating early, like 2 PM.
RX
Paper- Nouveau Chic, Holiday Theme, Bazzill is the card base, GP white, Club Scrap vellum , Brilliant Blue
Ribbon- 3/8" satin-color-Copen LSS (J's-100 yard (94.1m) spool $1.25 with 50% off coupon)
Tools- Sizzlits Snowflake #15, SU punch-eyelet
Embellies-Sakura gelly roll pen for sparkle, Silver hardware from SU
Someone commented.......
......regarding the poll on November 22. Pearlycat, this one is for you. On Wednesday, November 25, the day before Thanksgiving your request shall be granted. Cuttlebug, o cuttlebug, where are you?
Come out, come out where ever you are!!!
I did see the oval wooden frames SCS's are talking about at Micheal's today. They were in the aisle with all the other wood products like dowels, popsicle sticks, wood clothes pins, etc. They were $1.49 for the package and I am ashamed to say that I did not look to see how many were in the pack. However, you only need one. I made mine out of chip board. If you have a cracker or cereal box, you can make one, too. I cut my chipboard the exact same size as my embossing folder ( 4 1/4" x 5 3/4") (10.6cm x 14.5cm) and used Creative memories oval cutting system to cut an oval (duh) out of the middle. I used the largest oval and the blue cutter on the inside. The cutter blade would not go all the way through my chip board, so I used my finger blade knife to cut the rest of the way. To smooth out the inside edges I used Basic Grey's Precision File set. (I'll have a pic of that, too)
For my design I cut two pieces of chip board, each 1 1/2" by 4 1/4" (3.8cm x 10.6cm) I am giving you this info so you can get ready for tomorrow. I use A and C plates with the Cuttlebug and your cs should measure 4" x 5 1/4" (10.1cm x 13.3cm) to get the best embossed look.
See you tomorrow, Pearlycat, and thanks for coming by!!
Monday, November 23, 2009
Teen golfer
I needed the real estate so I made this a bit bigger than usual. It's 4 1/2 x 7 1/4 and again, like yesterday, I'll need to make a special envelope. The price we pay for our creations. Is there a challenge out there for unusual sized cards? For the inside, I used Justrite horizontal stamper with 2 different size Roman fonts. The stamp-a-ma-jig helped getting the congrats on straight.
RX
Paper-Club Scrap, DP from LSS
Stamp Sets-SU All About U, Just Rite Stampers--the horizontal stamper--the big one
Tools: Cropadile, stamp-a-ma-jig
Cuttlebug embossing folder- Distressed Stripes
Markers-Forest Foliage, Real red, More Mustard, Black, Choc Chip
Hardware- Tim Holtz' idea-ology 'swivel clasps', SU large eyelets, and picture hangers, and twill that I inked up with the brush side of the markers, then rubbed with a sponge to get the grunge look
SU black embossing powder for the sentiment and 'U'
Dimensional: SU unused rubber and foamThanks for coming by!
Sunday, November 22, 2009
Dream for a teenager
Got my Justrite horizontal stamp set out for this one and used the different fonts that I have bought over the years to stamp Jake's name. He's a great kid and it's hard to find stamps that are appropriate for my teenage grandsons. The "D" for dream is great for anything and anybody--who doesn't dream?
RX: Paper- red, yellow, black is Club Scrap. DP is LSS. the black edge around the DP is just black marker and a ruler to get it straight. Looks like paper,for a good fake-out and saves adhesive, paper, and the extra weight. Stars are SU star punches, two different sizes-duh! LOL Stamp set is SU 'A is for Adorable'
Thanks for coming by!
Poll
I need to take a little poll. Anyone interested in a picture tutorial on how I get my Cuttlebug to do the Nov 21 technique? If so, just leave a yes or no comment.
For those of you who may never have done this, follow this: Click on
comments below and it will bring you to the comment box where there will be directions to follow.
I'll be back to post a card later.
Thanks for coming by!
Saturday, November 21, 2009
Especially for a male teenager
More on this later...gotta go meet some friends on Treasure Island to see all the sand sculptures.
We had an awesome time on the beach. the sand sculptures were obviously done by pros. Tons of special sand was brought in for the event. pictures are to be sent to me soon and then I'll post them. to the right is the inside of Wil's card. I bought a date stamp years ago and just now inked it up. Now I know why I never throw anything away! I may need/use it some day. Used the CB Traffic jam folder on both front and inside using that new technique of placing chipboard over the closed folder and the impression is only partially made on the cardstock. Instead of an oval or circle, i just cut chipboard into rectangles and placed them accordingly. Well, the first try -- I put the chipboard where I wanted the impression and well that didn't work so I put that piece on the inside . I must remember to think of a negative image and place my chipboard properly. So, the next trip through the cuttlebug I needed two rectangles--one on the top and one on the bottom of the folder. Voila! the impression was on the top and bottom. In a nutshell, where ever you want the impressions to be, that is where you put your chipboard. Want a picture tutorial on this? check in tomorrow
RX: Paper is Club Scrap and LSS DP. I used SU tab punch to make the brackets and the sentiment is from the set 'One of a Kind' punched out with the SU Key Tag.
Thanks for coming by!
Friday, November 20, 2009
More Pink for Emma
Editor's note: Will be revamping this card before I mail it. It needs another layer.
Emma's favorite color is PINK. There is never enough PINK for Emma.
She's in first grade this year and I'm thinking pink may not be her fave for much longer. So this cute little mouse, with cute pink hands, will bring her a pink heart to remind her of pink. Emma dances to the beat of her own drummer. Her style is eclectic, nothing matches. The crazier, the better, for Em, she can put an outfit together like no one's business. If I can get a picture of her in one of her fashions I'll post it. She is positively the cutest fashionista that I know! She is tall and has more positive energy than that energizer rabbit.
Well, any way, I could go on about her forever!!
Editor's note: Beate uses Tim Holtz' ink blender for her sponging not the ink applicator that I mentioned above.
Emma's favorite color is PINK. There is never enough PINK for Emma.
She's in first grade this year and I'm thinking pink may not be her fave for much longer. So this cute little mouse, with cute pink hands, will bring her a pink heart to remind her of pink. Emma dances to the beat of her own drummer. Her style is eclectic, nothing matches. The crazier, the better, for Em, she can put an outfit together like no one's business. If I can get a picture of her in one of her fashions I'll post it. She is positively the cutest fashionista that I know! She is tall and has more positive energy than that energizer rabbit.
Well, any way, I could go on about her forever!!
I knew that I needed layers, different papers, and pink. These papers are from going inque's line 'Isn't it Romantic' from a LSS. They came in a pack with 12 sheets, I think. They're double sided so that gave me more options as they are all from the same line. They've been in my 12 x 12 paper file drawer for quite some time. I took this sketch from Flourishes called FTTC42 and planning on putting it up on SCS sometime today. I saw Beate from SCS use Tim Holtz's alcohol ink applicator to apply her "sponging" technique. I had one in my stash and got it out to try it. Oh my! "Sponged" up my certainly celery and away I went all around the white with the mouse image. Awesome! So controllable, add a little, add a lot. Thank you , Beate.
She has such great tools and ideas. I'm going to make her my Card Hero. Go watch her video on mosaic backgrounds, you'll see the applicator in action!
RX
Stamp: Happy Heart Day from SU
Paper: as above and GP white cardstock
Punches: Heart and Curvy Label
Ribbon: SU Certainly Celery remnant and unknown organza
Sponged Certainly Celery using Tim Holtz' applicator
Sakura gelly roll glitter pan
Ink: Blush Blossom and Going Gray and Certainly Celery
Card base 8 1/2'' x 5 1/2'' folded in half using the Scor Pal; background 5 3/8'' x 4 1/4''; horizontal stripes 4'' x 1 1/2''; large vertical 4 3/4'' x 2 1/2''; frame for mouse 3 1/2'' x 2 1/2'', 3 1/4'' x 2 1/4''; Image on 3'' x 2'' with that horizontal strip 2'' x 1'' edge punched with Curly label
My dimensions were not even close to the sketch. At least the layout is reasonably close!
Thanks for coming by! I appreciate your viewing my creations.
Thursday, November 19, 2009
Sugar and spice............
A pink, pink, pink card for a little girl. She is blonde, blue eyed 20 month old that will steal your heart. And smart, she is wiser than all her years. LOL, she's not yet two!
I stamped on Pretty in Pink using Going Gray for the bear and butterfly. Added a little Orchid Opulence on the butterfly, keeping it simple since there is enough going on with all the layers. Unearthed my sewing machine for this one. I have a small one for all my paper projects since I read somewhere that you shouldn't use the same machine for paper and fabric. I just adore the look of the stitching on special cards.
There is no occasion for this card, just to say Hi to my grand daughter, therefore I did not put a sentiment on the front. I'll just write her a little note on the inside.
For the butterfly I stamped the butterfly and then positioned the punch for the optimal look. Then I used my little snips to cut away some of the unstamped paper, but not all of it. The large butterfly from 'Butterfly of Happiness' set was the best of the bunch for this purpose. I just didn't want a plain butterfly. Hope you like it.
the 'Bow Bear' was the first stamp set that I bought from ebay, years ago. Once stamped and cut out, I used a black marker to outline her and then a little glitter pen for the edge of her bib. A lot of glitter pen all over the butterfly.
The stitching can be seen if you click on the pic.
I stamped on Pretty in Pink using Going Gray for the bear and butterfly. Added a little Orchid Opulence on the butterfly, keeping it simple since there is enough going on with all the layers. Unearthed my sewing machine for this one. I have a small one for all my paper projects since I read somewhere that you shouldn't use the same machine for paper and fabric. I just adore the look of the stitching on special cards.
There is no occasion for this card, just to say Hi to my grand daughter, therefore I did not put a sentiment on the front. I'll just write her a little note on the inside.
For the butterfly I stamped the butterfly and then positioned the punch for the optimal look. Then I used my little snips to cut away some of the unstamped paper, but not all of it. The large butterfly from 'Butterfly of Happiness' set was the best of the bunch for this purpose. I just didn't want a plain butterfly. Hope you like it.
the 'Bow Bear' was the first stamp set that I bought from ebay, years ago. Once stamped and cut out, I used a black marker to outline her and then a little glitter pen for the edge of her bib. A lot of glitter pen all over the butterfly.
RX:
Paper: Pretty in Pink, Wild Wasabi, patterned paper-unknown from LSS, GP white cardstock
Stamps: Butterfly of Happiness and Bow Bear both from Stampin Up
Whisper white ribbon Organza from SU
Ink: Going Gray
SU butterfly punch
Sakura gelly roll glitter pen, Marvy black markerThe stitching can be seen if you click on the pic.
Thanks for coming by! Hope Lizzie likes this card near as much as I do.
Wednesday, November 18, 2009
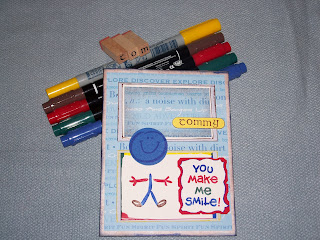
Tommy, just for fun
I just don't do many children cards and that's
about to change! Heather has three children,
her family lives about four hours away from
Seminole and we don't get together often
enough. Tommy took a spill on his bike this
past week and I thought he would get a kick
out of receiving an envelope with his name
on it! I didn't mention the bike mishap because
I just wanted a fun card not attached to any
reminders. Besides. I'll be
sending the girls cards, too. Just for fun!
Remember, you can click on photo to enlarge and then just hit your browser back button to come back here.
RX: Stamps-Celtic Alphabet from PSX #P1151, SU Smile and SU Smile Some More
Paper-DSP-DCVW Boys Blue; SU-Real Red, Yoyo Yello, Club Scrap-the pale blue textures frame, GP Image Plus white
Markers and Ink-Choc Chip, Real Red, Forest Foliage, Brilliant Blue all form SU and No. 5 yellow from Marvy
I punched the Real Red frame from the outsides with SU's Curly Label and used the same to punch little areas around the edges. Tommy's name is punched with word window and the smiley face was the 1 1/4" circle punch.
I used dimensionals for the face, name, and sentiment.
Thanks for coming by!
Tuesday, November 17, 2009
Been there
I have been buying and storing paper, stamps, ribbon, fibers, embellishments, you name it since 2004 right after my first Stampin UP card party. I hoarded more than I used, I bought more than I could hoard, you know the syndrome. Many of you have been there, done that. I know, I've visited your blogs, heard your stories, felt your pain! LOL OH, wait! Before 2004 I got all caught up in the scrapbooking movement when all we had was paper and stickers! I still have some of my very first stickers from Creative Memories. Need I say more,stickers from the stone age for Pete's sake!
Why did I go there? Because I have the need to explain why I can't tell you where some of my supplies came from or the company that made them. So I will bluff my way through or just say that it's a scrap or BOTD.
This card, I made about two weeks ago. I needed a simple thank you note for a special friend and never mailed it! That's right! Make 'em and don't mail 'em! Now, I have hoarding syndrome of the supplies and the cards that come from those supplies! And I have a blog to share my inadequacies with the rest of the world. How many stampers can say, "Been there, done that?"
RX: SU Polka Dot Punches stamp set using close to Cocoa ink on Creamy Caramel paper. SU ribbon. The DSP I haven't a clue. The background paper with the verbiage I sponged with Chocolate Chip. And the good old label maker that I pd $2.50 for at CVS with refills in four different colors says thank you. Simple, simple but says what it needs to!
Thanks for coming by. God Bless you all!
Can you take just one minute to pray for a friend that was just diagnosed with throat and liver cancer?
Amen.
Thank you!
Monday, November 16, 2009
Purple, red and gold
Here's a card that I made a while back.
And the inside......
RX: Fifth Avenue floral folder on Elegant Eggplant, SU embosslit die-leaves in a scrap of green with a dimensional behind the largest leaf, small Sizzlit button die in shimmery gold and tied with a scrap of red ribbon
the inside is a red scrap for the button and real red framing the shimmery gold.
Can't tell you who I will be mailing this off to in the morning. I'd like to surprise her.
thanks for coming by and do leave a comment. I'd like to hear from you!
Sunday, November 15, 2009
A promised recipe....spinach rolls
Eight layers later of phyllo and melted butter you are ready to make your rolls. Cut the squares first, I get 20-24 squares from each set of layers it just depends on you and the knife and the size you want. I like pop in your mouth size, mmmmmmmmmmmmmm. buttery, cheesy, mild crunchy good. Ok, so dollop a bit on the square and fold in two opposing sides, corner and corner, then fold the remaining two corners over that. Place seam side down on your cookie sheet, jelly roll pan, or stone. There's no need to prepare your pan because the buttery goodness will keep them from sticking. I try to have a sealed roll/square to prevent leaking, the cheese can escape and cause sticking. I use coated baking pans and have never had a problem even with cheese leakage. Next, once all your rolls are ready and on the pan take your pastry brush and brush on some more butter on each and every roll/square--just the tops and lightly.
For those of you that have never worked with phyllo, here are some tips and you should find these tips on the package, also. take package out of freezer and place in fridge overnight. Depending on your climate some of you can remove from freezer and place on counter for two hours. It's humid and mostly hot in Florida, so I find leaving in fridge overnite is best for me. I open one pkg at a time, you can leave the other in the fridge til you are ready for it. It's just like thin paper, but remember it is dough so treat it gently. If it is ready to work with you can tell, it will unroll and look like it will separate easily. If it is too stiff it's too early, leave it on the counter for 10 minutes. back in the pkg or cover with a clean kitchen towel. If it looks ready and you unroll it and it's still a little stuck you can rub your dry hands over the top layer gently letting the warmth of your hands get it to thaw and separate. Your spinach mixture should be ready by this time. I made mine the day before and let all the flavors merge in a covered bowl in the fridge.
let's say your phyllo is ready, lay one sheet on your work surface and brush with melted butter (the full recipe will be at the bottom). Lay on the next sheet and butter again. Do that eight times and you'll be ready to cut your squares. I use for a work surface a plastic cutting board. You could do it right on your granite surface, a wood cutting board, the back of a cookie sheet, the original recipe called for you to make them on a tea towel. I didn't have a tea towel so I used an old pillow case, but you have to throw it out when you are done because it's so buttery.
Since I am rolling what's a little more butter! Fold in the sides as you roll. OOPS, this isn't part of the original recipe just my take on the "leftovers". You could have sprinkled the phyllo with sugar, cinnamon, honey, nuts, any combo you like to use up the rest of the phyllo. the dough is getting doughy because it was so crinkly dry all I could do was pat teh melted butter on using the brush. meanwhile keep rolling and now brushing and place the now, log, onto your pan.
When they come out of the oven I just push them gently around while still extremely hot and that may cause them to not stick to the pan. At this point the house is smelling so good--oregano, cheese, onion. Let cool a little and pop one in your mouth, ooooooh my. The phyllo hits your tongue and the roof of your mouth and starts to release the first layer of butter and then the meld of Parmesan and sharp cheddar with the onions, spinach, and oregano. And you haven't even bit into it yet! OH my. And then the tender crunch when your tongue rolls and teeth come together. Savor that for a moment. You know what? I have some in the freezer, am running up the stairs, take them out, place on counter and I'll be back in a minute.
They smell good even frozen. Took pictures, duh. They are some that I made last month, check the date on the bag! Put them right on to a small bar pan and placed it in the toaster oven. Set it at 375 F. for 4 minutes.
WAITING!
Here's the recipe: the original is highlighted in her words; the yellow is mine
From The Kitchen of Audrey M
1 pkg frozen (chopped) spinach (10 ounce)
1 TBSN parsley (dehydrated)
1 medium onion (original does not say but I finely dice in a food chopper)
2 eggs
1/3 cup olive oil (I use evoo)
2 teaspoons salt (not me, cheese has plenty of sodium)
dash of pepper
1/2 tsp oregano
3/4 cup Parmesan cheese
1/2 lb. grated cheddar cheese
1 box filo dough
1 1/2 sticks melted butter (use what ever you have, salted or unsalted)
Cook spinach & let it drain. (squeeze the liquid out with hands and then break it up with a fork) combine all ingredients except butter. (and phyllo) Toss til well mixed. Dampen a tea towel and lay on counter. Take one sheet of filo (that's how she spelled it) at a time, lay on towel and brush with butter, do this for about 8 sheets. Cut sheets into squares about 2" x 2". Put 1/2 to 1 tsp spinach mixture into center of each square. Fold sides in and roll to form. Place seam side down and brush with butter. Bake at 425( degrees F) --10 to 12 min.. Serve hot. Once cooked they freeze nicely. Just warm when needed.
thanks to Aud . she gave me this recipe about 30 years ago on a 3 x 5 card and i'm still using it. I must admit though-the first time I made them, I helped Audrey and she had been making them for years. I must ask her where she got the recipe.
follow directions on box of phyllo dough. I do not cook my spinach-thaw and squeeze. I get approximately 100 rolls from this recipe not including the log. I have used the leftover spinach mixture in folded eggs and it is lovely. Yes, it takes some time, but once you have made them it runs smoothly and quicker. It's great to have someone help you roll them to cut the time in half. Remember, I make and bake a week in advance, and freeze. Let them completely cool in the pan and then right into a freezer bag. Just make sure you eat one or two before you freeze them. You need to be able to make that comparison from fresh to freezer and reheated. Who am I fooling? You will not be able to resist tasting once they have cooled a bit. caution: rolls are hot, extremely hot--do not burn your mouth, or tongue or cheek, or lips--if they touch your lips. hehehe
An extra plus--these rolls will maintain your guests' happiness even when they have come to room temperature. I'm just saying--they are the perfect people pleasing appetizer. (I can't spell hors de oheurves, obviously.) When entertaining, place rolls on cooking sheet while frozen, let them sit out, reheat at 375 F for 5 minutes. And they are done. OR-- place frozen rolls on cookie sheet bake 375F for 4 minutes, turn off the oven and go take five minutes to relax before your guests arrive.
this took a long time putting together. One more pic and I'm toast. (or rolled) hahaha Gotta go call Audrey!
i ate two and gave you more than one pic. Again, I couldn't decide. that's my small bar pan, stoneware, that I just love since there are only two of us sharing the nest, now. Can you tell me how many spinach rolls went back into the freezer?
Saturday, November 14, 2009
Christmas trees
I am usually a procrastinator when it comes to putting up the tree, but this year it has been on my mind and it's just a tad bit too early yet! I need to get past Thanksgiving before the tree and decorations go up. Isn't that normal? What do you usually do about putting up your tree, one week, two weeks, three weeks, or four weeks before Christmas?
In my humble opinion, the stores start decorating as soon as Halloween is over because they want to get the
Christmas stock out of the back rooms/storage areas, making room for more merchandise to be stored for the day after Thanksgiving. Just like you and me cleaning out the fridge to make room for the new groceries. Just like you and me (in the old days) cleaning out all the kids old, broken, no longer age appropriate toys to make room for all the new. Just like you and me cleaning and dusting, making sure all flat areas are cleaned off so we can wait one hour to have it look all the same. Where does the dust go? Ten minutes later, IT"S Baaaaack! When you go visit a friend or family member and you see dust do you say to yourself, "Gee whiz, terrible cleaner." or " Man, she must have just dusted and the 'bunnie's are back."? Gotta go, I could come up with a hundred more, and you don't want that!!!! Hey, thanks for coming by to see my stuff.
Christmas tags
Just fooling around with some of my Spellbinders and Quickutz and created some very simple tags for packages under our tree.
Used some scraps that I store in a homemade binder. Mostly SU, the green on the bulbs is Club Scrap.
The Santas, holly, and bulbs are all Quickutz. Oh! the scalloped ovals are Spellbinders, too! The Santa with the ribbon is the scalloped oval die cut and the other Santa is the frame of the first one.
Green ovals are the oval punch from SU . All the eyelets are BOTD. the holly background is SU Shimmery Silver and the same paper on the frame of Santa with the red background.
A Krylon Silver leafing pen was used to outline the bulb ovals and frames. I {heart} those Krylon leafing pens. They come in red, copper, gold and silver and I buy them at the J store and M has them, too.
Now on to the reindeer from Spellbinders. I couldn't decide which pic to choose so I didn't choose. Picked them both for different reasons. The deer on the right is cut from gold paper from SU and deer on the left is from SU kraft paper. The pic on the right reflects the gold deer so you can see the difference. Plus, I liked showing the deer 'die' in the middle and the roll of copper cord from Stampin Up.
The pic on the left, just simply liked the Spellbinder's pkg in the pic. I had some red leather scraps that I found on a clearance aisle in J's and wrapped it around the their necks. I used SU pastels, brown to add some felt to the antlers, pink on the ears, penciled around the ears, jaw, brows, and a black marker for the eyes and mouth. Now that I see them side by side the debate is over.
I definitely like the one on the....................................... Which one is your fave? (When I go to publish this, the pics are not side by side, so bear with me while I try to work this out.) OK! close enough. Thanks for coming by to view my creations, simple, and the grand kids will love them.
Friday, November 13, 2009
The newspaper......
Is black and white and read all over!! That is an old riddle!!! Now for the red, black and cream...........
Another challenge from SCS using another Waltzingmouse stamp from the Celtic Heritage set.
The inside has a simple stamping replicating the front.
HINT: I used my left over foam from my SU stamps to make my dimensionals. The Celtic stamps were stamped on the Confetti Cream twice and one set was cut out and applied with the dimensionals.The triangles were also set with SU recycled foam, the thin foam. Some of the foam is thinner than others. The thinner foam was from alphabet stamps and the thicker from the other stamp sets. I peel off the rubber and toss it, apply the foam to my paper piece with the brown paper sticking up. When I am ready to affix the paper piece I peel off
the brown paper and it sticks very well. My black rhinestones would not adhere very well, so I ran the backs over an emery board and voila! They decided to stick and stay put.
Here's another hint: I knew I wanted to use the photo corner punch so I punched them out of the red piece that I was using on the front of my card. Punched twice since I only wanted the small ones. Saves paper and takes some weight off the card. My cropping knowledge was useless to me today, so you get the whole ball of wax, including some of my work area.
Thanks for coming by to see another challenge, my plethora of hints, and my rambling.
Another challenge from SCS using another Waltzingmouse stamp from the Celtic Heritage set.
The inside has a simple stamping replicating the front.
HINT: I used my left over foam from my SU stamps to make my dimensionals. The Celtic stamps were stamped on the Confetti Cream twice and one set was cut out and applied with the dimensionals.The triangles were also set with SU recycled foam, the thin foam. Some of the foam is thinner than others. The thinner foam was from alphabet stamps and the thicker from the other stamp sets. I peel off the rubber and toss it, apply the foam to my paper piece with the brown paper sticking up. When I am ready to affix the paper piece I peel off
the brown paper and it sticks very well. My black rhinestones would not adhere very well, so I ran the backs over an emery board and voila! They decided to stick and stay put.
Here's another hint: I knew I wanted to use the photo corner punch so I punched them out of the red piece that I was using on the front of my card. Punched twice since I only wanted the small ones. Saves paper and takes some weight off the card. My cropping knowledge was useless to me today, so you get the whole ball of wax, including some of my work area.
One more little hint:
This picture I took to show you what I use to paper pierce. That bright pink thingy is the toe part of a flip-flop. Yes, that's right, a bright pink flip-flop with a pipe cleaner through the toe hole to hold it on a hook right in front of me on my work desk. Can't live without the mat to place my piercings. The doo-hickey on the end of my piercer is a cork from my friends wine bottle. I take a remnant piece of ribbon and wrap it with floral wire around the cork, again so I can hang it up right in front of my area. I have a few and they come in handy!! Corks that is!!! LOL The flip-flop also holds my silver ball straight pin. See it popping out on the top left!!! It usually is pushed all the way in with just the silver head popping out. That's the pin that unclogs all my glues, stickles, crystal effects, etc. Just remember not to put it back in too far at least not until the glue dries, or I just use scrap paper or paper towel to wipe it off.Here's the rx: Paper: Club Scrap Only the Confetti Cream is from SU;INK: SU Red Riding Hood
dimensions for paper can be found at SCS here. Just scroll down to where it says Winter Moose, click and it will take you to the cutest card and all the dimensions.Thanks for coming by to see another challenge, my plethora of hints, and my rambling.
Blog candy in North Carolina
kristin's blog has a picture of the blog candy and what a ton of sweet stuff!!! Check out the picture here and then from kristin's blog head on over to jacque's. You will need to leave a comment at least and surely you will want to see some of her creations! She is a very talented lady.
I'm working on a sketch right now and will have it posted soon..like in a bit....like today!!! think black and cream and red. What is black and white and read all over?
See ya soon!!!!
I'm working on a sketch right now and will have it posted soon..like in a bit....like today!!! think black and cream and red. What is black and white and read all over?
See ya soon!!!!
Thursday, November 12, 2009
A GATE FOLD.......................
Sometime ago I saw (click on her name to go to her blog) Beate do a gate fold card on a video on SCS and I liked the panels she put on her card. It was a Christmas card and the panels looked like Stampin Up's red flocked Christmas paper! I believe if you go to SCS and click on resources, you'll find her card on the video near the end of the tutorial named Gate fold card. Let's go to my card. Everything is Stampin Up except the flower petal, that came from my local craft store. Some of my cards get the inside all made up and some just a little something and some none at all. It depends on the worthiness of the recipient (card worthy) and my creative "tilt" at the time.
This card was fun and oh so easy! Thanks for coming by and have a great evening!
SOAPBOX
My DH asked me what I wanted for Christmas this year! How thoughtful of him to ask so early!
My answer, " What I want for Christmas is for the economy to get better, to have more work." His comeback, "Well, come back to reality and tell me what you really want." I can't say that we need to ask for nothing, because the retailers are hurting already. It's such a catch-22? SOOO... What I really want for Christmas is for the world to know peace, for all of us to have a roof over our heads, food on our tables, love in our hearts, and God in our lives. Isn't that enough?
This year that's asking a lot for some people, but if we keep the faith good things will come.
Wednesday, November 11, 2009
MY FIRST CHALLENGE
SCS was calling my name this week and I got the challenge from their Weekly Inkling #183, SCS252. Rox71 had an awesome card and I CASED it! (Copy and steal everything!) Here is Rox71's card. Anyone can go to splitcoaststampers and sign up, it is free unless you want to be a Fan Club member. I like to just go there and look at all the amazing cards and things that people have made. It's user friendly, even I can navigate around their site. My stamp is from Waltzingmouse Stamps in Ireland. The set is called Irish Blessings. Her button is on the right sidebar.
TECHNIQUES: Paper piecing, sponging PAPER; DCWV-Old World Stack, SU's A Artichoke, E Eggplant, black, confetti cream INKS: SU's E Eggplant, Forest Foliage, Bravo Burgundy, Soft Sky TOOLS: spritzer, watercolor pencils, blender pen, Sakura glitter pen, two black square stick-on embellies from the BOTD
I used markers the same colors as inks above and "spritzed" them all over a 5 1/8" x 3" piece of CC and then cut it into two pc's and had some left over. All measurements can be found here. I used a punched out scallop circle to sponge in my sky. Odd and old scraps I found were used in piecing the green hills and shrubs, the brown thatched roof and side of the house. I inked up the Weathered background stamp and applied it to the side piece. Then I used my favorite liquid adhesive, Tombow Aqua to apply all the tiny pieces to my CC cs. The sakura glitter pen was used to highlight the grass and greenery and window panes.
Hope you enjoyed looking as much as i enjoyed sharing with you! Thanks for coming by to see my accomplishments today.
Friday, November 6, 2009
Rhinestone Butterfly
SU DSP for the background and it's reverse side for the Bigz Top note.
I flipped those papers over for the inside, using the scraps that were left over from the front. SU Chocolate Chip paper was used for the QuicKutz flourish, Chocolate ribbon from SU. Cameo Coral for the butterfly, and the yellow blossom was an old piece of SU that came in a "book" with three other colors of 6 x 6. QuicKutz daisy was used to die cut the blossom. All on a white card stock with dimensionals. The bling was from the bottom of the drawer, BOTD. Remember, bling is bling no matter where it comes from IMM--in my mind!!!
Just a little note--I ordered Twinkling H20's weeks ago and they finally came in via the USPS. I am practicing adding water and mixing so that I'm ready to have B and P over to color our bells. Wait til you see them! They are awesome now, but I expect even more so after they have some "twinkling" on them.
Thanks for coming by to see my card today. I had four cards, two you have already seen, attached to my pictures file and just now found them and knew I had to share. Now you've seen three, one more to go and then I will have to address my picture problem. Better go work on that right after dinner.
Trouble in Cardology
Having some trouble downloading photoshop and until I can I am on hold for the blog....I want to have a watermark on my pics. I need PS to do that, soooo.....bear with me. Meanwhile, all my pics are on my external hard drive and that may have a virus, so my pics are tied up til I can figure this one out, too. See ya later. Do come back soon, though.
Tuesday, November 3, 2009
Outside and inside
Here is the card that I posted on SCS. I needed plenty of room so this card is 5 1/2 x 8 1/2. My friend A and her hubby, Frank celebrated their 50th wedding anniversary on Oct 17 out on St Pete Beach two weeks ago. I heard the party was phenomenal, I was too ill to go, but I sure heard all about it. They had family come from all over the USA to celebrate Mass and a lovely reception. A is Irish and so I added a Celtic cross embossed in gold then cut it out, and placed one on the front and one on the inside. I used some Club Scrap paper and CS vellum both in and outsides. The three Celtic stamps that were all embossed and cut out were from Waltzingmouse Stamps in Ireland--two crosses and the Claddagh. The sentiments on the front were from the same Celtic stamp set.
The verse inside was from SCS and printed on my computer
then sponged in gold and the outside of the Nestie, in black,
was placed over the sentiment, also, sponged in gold. The
Nestie that was cut out was used on the front. I know, how
paper saving was that! LOL Gold ribbon, covered chipboard
brought it all together.
Happy Anniversary to all the couples celebrating 50 years,
what a wonderful feeling that must be!
Remember, you can click on the pics to make them
larger. Enjoy, and thanks for coming to check out my
creations!!
Claire Brennan owns Waltzingmouse Stamps and you can find her store
and her blog here. Now is the time to go visit as her prices are going up
on November 5. Her stamps are clear and of the best quality. Go check
out the great Christmas stamps and Nestie friendly ones, too!
Monday, November 2, 2009
Contest answers
This in from Bill............................
1) 3BM SHTR 3 BLIND MICE SEE HOW THEY RUN
2) 3C=F 3 COINS IN A FOUNTAIN
3) 5 1/2 Y=R 51/2 YARDS IN A ROD
4) 8F=M 8 FURLONGS IN A MILE
5) 8 1/2 G=F 81/2 GALLONS IN A FIRKIN
6) 11M=FBT 11 MEN ON A football TEAM
7) 18H=GC 18 HOLES ON A GOLF COURSE
8) 25C=Q 25 CENTS IN A QUARTER
9) 48C=PD 48 CARDS IN A PINOCLE DECK
10) 53C=DWJ 53 CARDS IN A DECK WITH JOKER
11) 64S=CB 64 SQUARES ON A CHECKER BOARD
12) 88K=P 88 KEYS ON A PIANO
13) 90D=RT 90 degrees IN A RIGHT TRIANGLE
14) 101 D 101 DALMATIONS
15) 366D=LY 366 DAYS IN A LEAP YEAR
16) 1760Y=M 1760 YARDS IN A MILE
17) 9600RCY=11000Y 96000RADIO CARBON YEARS EQUALS 11000 YEARS
18) 144=G 144 IN A GROSS
19) SPCA SOCIETY FOR THE PROTECTION OF CRUELTY TO ANIMALS
20) 5C=N 5 CENTS IN A NICKEL
21) 3P=T 3 PENCE IN A TRUPENCE OR 3 PENNIES IN A TRUPENCE
22) 7WW 7 WONDERS OF THE WORLD
THERE ARE THE ANSWERS......TOLD YA TO PUT YA THINKING CAPS ON!!!! OF COURSE NO ONE GOT THEM ALL. JOANNE GILCH OF SEMINOLE CAME THE CLOSEST-----WITH 19 CORRECT
I missed 5, 17, and 21. I did not know the answers for 5 and 17 and for number 21 my answer was 3 points on a triangle. Bill said we should stay tuned for another contest so keep on checking in for more fun, excitement, and cards. O! Who is ready for a recipe?
Sunday, November 1, 2009
Bill's Halloween Contest
This is a Hallowen contest that my brother, Bill, put out to his email friends and family! I have already submitted my answers and I thought that some of you would like to play the game. I'll give you a clue on number one............part of a children's nursery rhyme song.
Bill gave one clue when he realized most people were missing four---old measurements. At that time I was only missing three of the numbers 3, 5, 17. My final answers were sent in on Friday still with 5, 17 missing.
I got number 3. 5 1/2 yards equals 1 rod. So that leaves me with 5 and 17. See hints from Bill at the bottom of the game.
Here's Bill's contest
WORDS MUST BE SPELLED EXACT! EXAMPLE: 10P=D 10 PENNIES EQUAL1 DIME
9M=BBT 9 MEN ON A BASE BALL TEAM
8S=SS 8SIDES ON A STOP SIGN
12D=G 12 DOZEN EQUALS 1 GROSS
1) 3BM SHTR
2) 3C=F
3) 5 1/2 Y=R
4) 8F=M
5) 8 1/2 G=F
6) 11M=FBT
7) 18H=GC
8) 25C=Q
9) 48C=PD
10) 53C=DWJ
11) 64S=CB
12) 88K=P
13) 90D=RT
14) 101 D
15) 366D=LY
16) 1760Y=M
17) 9600RCY=11000Y
18) 144=G
19) SPCA
20) 5C=N
21) 3P=T
22) 7WW
HINT: THE = SIGN MEANS : IN A ON A EQUALS IS A GOOD LUCK!
I will have the answers on Monday, November 2, 2009
Before...then after... and the final touch
The BEFORE.........
Certainly celery, barely banana, and pixie pink, two SU stamp sets brought me to my knees begging for some inspiration and here's what came of it....
MS's bday is in October and I needed a great card. Something happened in the left side of my brain and this was made. Was not happy and walked away to come back later and create something else. Well my age and upbringing would not let this card go in the blue basket at my right foot (the trash)sooooo.............I got out my primas and leaves and buttons and.......this is what she got!!!!!
_______________________________________________________________________________
The AFTER.............................................
I smathered the barely banana with Tobow Aqua liquid adhesive and layered on some leaves from CTMH from Kristin. They're called Just Blooms Autumn Leaves. Close To My Heart has clear stamps and tons of paper and embellishments. On top of the leaves I placed primas from Bazzill and some bottom of the drawer buttons. Bottom of the drawer means I no longer recall who made it, the name or the color whether it's buttons, paper, ribbon, etc. If an item is in it's original packaging/wrapper then I can give credit where it's due, otherwise BOTD. Then it needed something more and I added a yellow strip on the side where it opens.And the final touch.....
Hope you like it and thanks for coming by!!!!
Subscribe to:
Posts (Atom)