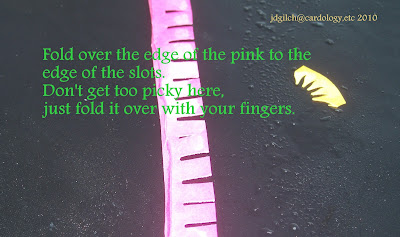
Home made flower using the slotted border punch.
Hope you found this useful, informative, or just plain crafty cleverness.
I would love you to remember where you got this and
Give credit where credit is due.
I came up with this flower idea and have seen it no where else!
I used two home made glue dots to adhere this flower to this card.
Make sure you wait for it to dry!
May 25, 2010
Spiral pop ups
It is so easy to do. Punch or cut out a circle. I used a 1 3/8" circle punch from SU. No need to mark the circle, just cut it in a continuous spiral and there you have your pop up! I tucked the outside portion in under the red striped paper and glued a large open star on top. The inner part is at the top of the card, glued down with a small blue star. There is an open red star just hanging around on the spiral and it is free to slide up and down the spiral. now, my regular stick to everything wonderful glue was not strong enough for this pop up job so I used Glossy Accents. It is the best glue ever for the really hard to hold jobs, and it dries quicker, just don't lay it on thick when using as a glue.
Here's a pic of my circle with thick black marker drawn in a spiral for visual purposes only. If you are unsure of cutting properly you could always use a pencil very lightly and erase before you take the top off of your glue!
here's a pic of one card that i did for OWH Blog hop May 29th, 2010
Wednesday, November 25, 2009
Cuttlebug Tutorial
Yesterday there was a tidbit on how to cut out your chipboard for an oval to use in this tutorial. If you don't have chipboard cut your oval or whatever shape out of a cereal box, cracker box,etc. You will need to cut two and glue/paste them together to get the thickness required. Cut out your shape first and then match them up so you don't have to use a craft knife to get all the way through. The die cut shape you choose should go all the way through one layer of a cereal box. Ready?
Put your cs in the embossing folder, place the oval frame over the folder, and sandwich between the A and C plate.
Run it through the bug.
Cuttlebug embossing folder 'Floral Fantasy' was used with the pink paper.
My version with the strips of chipboard:
I used the mesh embossing folder for this one in Certainly Celery.
 Tammi has a great video on this tutorial which includes her water color technique, also. I found Tammi through a forum at SCS about embossing. She used a Big Shot instead of the Cuttlebug.
Splitcoast Stampers is a valuable site for all kinds of ideas. It's easy to get around their site and plenty of fantastic people if you need help.
Pearlycat, I hope you enjoyed this as much as I did doing it for you.
Send me your email so I can contact you and I'll send you a template.
Thanks for coming by!NEWSFLASH !!!! I just cut ovals out of 5 pieces of SU cardstock, 'snailed' (taped) them together and it made a perfect thickness to get the right effect. Four pieces worked but 5 was the 'charm'. I used two sheets of Confetti Cream for those of you who 'need to know'. You know who you are!! teehee
Second newsflash!!! Started a load of laundry, emptied the detergent box....woohooo! The box is the most perfect piece of 'chipboard'. Two layers, equal thickness, my CM cutting system would not cut all the way through, but it was much better than the chipboard I started with. Used the finger cutting blade on a piece of glass and, Voila! When I make a template with a Nestie scallop oval I will definitely use the 4-5 pieces of cs since that will go all the way through each piece. OR you can always use a Sizzix die, they cut through almost anything! 


