Tuesday, December 29, 2009

Birthday butterfly


Remember this paper? I used it previously on another pink card on Dec 13, 2009. The background is one sheet of paper called Vintage Wallpaper and I added flowers using the five petal flower from SU and DSP and Pink Pirouette. Sponged the flowers with those little trianglee make-up cosmetic sponges(they get into tight spaces) with Pretty in Pink, curled the ends, placed two upside down and put two right side up on top of the other two. Are you still with me? The leaves are the five petal flower punch, also. I folded them almost in half and glued them to my background paper. Propped the butterfly with dimensionals after adding waxed cord for the antennae. added some bling to everything and then Glossy Accents to make it look like dew. Last, but not least, I added an outline sticker for HB. When you click on the image and it gets bigger you can really see the dew. Oops, don't forget the white ribbon!!

PS. the project with Emma is coming along nicely. Slowly, but nicely. We are both learning to make fun stuff  together. Have you ever made a chair/table out of a cereal box? The first part of our project should be done tomorrow and then you will begin to see the pictures. Oops, maybe not, we have a big day ahead of us. The donut shop at 6:30 am, shopping, then lunch and movies with Uncle Bill, then home to work on the "closet", part of the project. do you know what we are putting together, yet?

Thanks for coming by!

Monday, December 28, 2009

Hello Kitty

Megan's birthday is coming up and I know she loves Hello Kitty. remember her HK purse card holder that she designed? Well, my friend Gayle let me borrow her Hello Kitty Sizzix dies and oh boy, they are so cute.
Hello Kitty takes up the whole card front, so there is not much room to add anything but ribbon.


Pretty in Pink is the card base and Pink Pirouette is the background that I ran through the CB with Petals a Plenty EF from SU. Emma put the glitter pen dots on the embossing while I got the ribbon and bow ready. I used assorted scraps for the bee costume and flowers and ladybug. A gold vellum was used for the bee's wings. I had a spool of HB ribbon from who knows where!!
She will be five in two weeks and she will love this card, I know it!! I was looking for a button or something that had a five on it. Any ideas from my fan base out there? Just leave a comment.

Thanks for coming by!

Sunday, December 27, 2009

Recycling Christmas wrappings


One of the challenges this week over at SCS is to use
1. an image from a greeting card
2. a scrap of wrapping paper
3. a ribbon or bow or fixing from a gift
to create a new card.

Took the wrapping paper that is the background and crumbled it up even more than it was to give it the cracked effect having more white come through, tore it on one end attached it to the white base, then dabbed it with a bronze ink pad. Cut Jesus and Mary from a card that was from my cousin, this year. Thanks to Dan and Jo Sullivan. The shimmery white ribbon is from a gift from Jeanne that I received Dec13 when we met at Panera's. The ornament tag is one I made, and had on a gift to Emma. Turned it over and will add a sentiment when I'm ready to send it next Christmas. The little red curling ribbon was on a gift as all my gifts this year had that ribbon on them. Then I punched holes and put some elastic gold cording through the trim on Mary's robe. It's very hard to see in the pic but looks amazing IRL. Oh, placed my card image on white paper and didn't like the way it looked so I edged it and the white base, and the ornament with a gold pen. TADA!

Thanks for coming by!

Saturday, December 26, 2009

The day after Christmas

While many people are out shopping for the bargains that weren't there before Christmas I'm typing up a sick story. I am sick. That's my story and I'm stickin' to it. Went to bed with a sore throat and woke up feeling yucky all over. Thought I had the flu. Got up, came downstairs to see if I could hook up my new Christmas present. I did it!!!! I got the Wii up and running. Played one game and said if I can play, I feel well enough to not have the flu. Great! Just a cold! Great! Played a couple more games. Called hubby down to play with me and I worked out all those aches and pains that I thought was the flu playing with my sore achy body.
So, if I'm not that sick then we need to go pick up the 6 yo GD. She lives across the state so we met her Dad half way. She is here for 8-9 days and we have big plans. She too, has a cold, so we both sniff together. Today we made plans in our heads for our project and here's a pic of what we will be using.

Part of the story: She said she wanted something special for Christmas this year when I spoke to her last week. Her Mom and I were planning her trip here and a light went off in my head. So I said to DGD why don't we make our own. She got so excited. I told her what she needed to bring from home and that she needed to ask her Mom to raid some of her stash. When we picked her up she had a huge black bag full o' stuff. We came home and played Wii after our four hour drive. Had Our DS and his fam over to play, too! She just can not wait til tomorrow to get to this pile and start creating. I'll post tomorrow to give you a peek.
Can anyone guess what we are going to make from boxes of all sorts and fabric? Can you see some fabric hidden in that pile of corrugated mess? DD sent over three bolts of fabric that Em had picked out.
Thanks for stopping by!

Friday, December 25, 2009

Merry Christmas

My plan was to have something posted for you today. I have been looking through the
SBS 29 blogs and leaving comments to all the new posts that they had. I admit that I am not IT qualified, and you know it. I couldn't come up with anything wonderful to play here, like a song or video so I am sending you to Kim's blog to view 'Where's the line to see Jesus'. Just click on Merry Christmas.
Merry Christmas to all of you that come to grace my blog. My the peace and love of Christ be with you all!

Thursday, December 24, 2009

December 24th....yes Virginia there is a Santa Claus

The Christmas meals here start at 10 AM. The children and their children come for breakfast/brunch. Lindsay and I fix the same, sort of, every year. I make crumb cake, my oldest's recipe, and a PamperedChef recipe that goes something like this-coconutty brunch biscuits, and Lindsay makes a breakfast casserole with eggs, etc. Two of our children and their fams are staying home this year ( they don't live in town)! Phooey! Wish we could all be together. Then DH and I will put the finishing touches on the big meal, turkey, ham and all the trimmings, as we say. Everyone is bringing something, which makes it easier on DH and me. We will do creamed pearl onions, mashed potatoes, green bean casserole, the turkey, dressing, ham. I made two pies, a French Silk and pecan, today. The others are bringing sweet potatoe casserole, cranberry sauce, an apple pie, rolls, yellow squash, broccoli, and I don't have my list here so I think that may be all. Isn't it enough?

So in between baking I took a couple o' breaks and swung down here to get some creative juices going. I was thinking about a card last night before I fell asleep using the Medallion background stamp, but something else came out of me when I saw this tissue paper that was in a box from Jeanne, my friend.

Sometime ago, I made a card somewhere, not here at home! We stamped on tissue paper then crumpled it up, then opened it up and glued it to card stock then made a card using this technique. That's exactly what I thought about when I saw this tissue paper. IRL it looks so much better.
   The circles on the bottom are layered buttons, a technique challenge that I found here.  My buttons are layered with white, red, and green scraps from my PIECES  file.
 

 More tissue paper just glued flat to white card stock covers my buttons. You have to glue tissue paper to cs and let it dry before punching out because.. well, have you ever tried to punch out tissue paper? It's near impossible to get a clean punch, it's so thin.
I used a 3/4 inch circle punch and my cropadile to punch just one hole right smack dab in the middle of the 'buttons'.  Used gold cording and red ribbon to 'top' off my buttons. I wanted a clean and simple card as I will be making several for next year.
I joined a group over at SCS where each one of us will make so many Christmas cards per month from now til November. My contract says that I will make two cards per month as I don't need many. The challenge is to make ten per month and I don't know what I would do with 110 cards. Anywho, back to the card. The candy cane is holding  red and green ribbons that match the candy. The background stamp is Canvas and inked up in Real Red. I used nesties to cut the circle, and Glorious Green to sponge it. I sponged the card base with Real Red. I will add sentiments before I mail next year. Who knows there may be a new sentiment waiting for me out there.
Here are the papers drying last night.

 Thanks for coming by!

Wednesday, December 23, 2009

Find Joy in the Little Things

Mojo Monday sketch 118
 
Combined with the SCS color sketch CC240 using Taken with Teal, Apricot Appeal and Chocolate Chip makes for double the fun. Here's my interp of the sketch and challenge.

EDIT: My camera did not do this card justice. The colors look all washed out.
I ran my generic DSP, the Ch Chip And Taken with Teal through the CB ef, Houndstooth. Then sponged a little bit all over the embossing and the edges with Choc Chip. Oh yea, used the spritzer to add some Choc Chip to the top DSP only. I did not want to cover that with a ribbon so I put the ribbon at the bottom, hence, the upside down look. I inspire the unusual so this fits me fine and I like it. the sentiment is on a Curly label punch out and a word window. Popped up the sentiment and the layered tag piece, attached three snaps with the cropadile and finally used a big glue dot to adhere the knot of the ribbon.

RX: I think there is enough info above to skip the RX today. So much to do, so little time.

Thanks for coming by, again!
I wish you all a very Merry Christmas. For those of you who believe-May you have a Christ filled day!
And those of you who believe-May Santa make all your wishes for this holiday season come true.
Happy Hanukkah!
Happy Kwanzaa!
Oh Happy Day for those of you that don't celebrate, like my Bro B.
I wish you all love, peace and eternal happiness!

Postage

 Yesterday's card, the sympathy card, the Carol card, the wee tribute to Dave card started something at the PO to get my Irish up.
Used Nesties for my sentiment and main image, sponged the edges of the label 2 and all over the circle. Popped up the tree and sentiment. the sentiment was popped up on the left and just two pcs of paper under the right to make it even. The button on top of the ribbon made it a 'hand stamp' card. One question--why has the price gone up so much to mail these 'hand stamped'? I mailed out 4 cards today and each one was $1.22. They used to be 56 cents each. The postman asked if they were cards inside, of course. The fifth card was in bubble wrap envie and it was 88 cents til I told him there was a card inside and then he bumped it up to $1.31. All of them were being mailed within US. Any answers out there? Any body work in the USPS? Did I misunderstand his question? Did he say gift card? Or greeting card? (I can't remember now.) And would that make a diff?
Next time I'm at the USPS I am going to ask!!!
I like all the bling, and buttons, and layers, and stuff. I don't want to do one layer cards, except for challenges, or maybe real cool ones that can make it as one layer. One layer cards don't get too many ahs and oooos, not the ones that I make, anyway.
     Thanks for letting me get that off my irritated chest!
I've got a card to finish and will post that in a wee bit. Come on back now, ya hear!!! That sounded like the Beverly Hillbillies to me. OH No! I'll be singing that the rest of the day, in my mind!

Tuesday, December 22, 2009

Sympathy Card

Do you remember the card I made for Dave? Well God called him and he answered! I made this card for Dave's wife, Carol. Dave was like a Grandpa to my DD and her family, they were neighbors. He could be found at any time in the spring and summer mowing his neighbor's yard, pruning flowers, babysitting while H ran to the store for a minute or two. In the fall he was raking the leaves, not just his own lawn, either. In the winter, Dave was out blowing snow to clear the driveways and walkways, and sometimes more than once a day. He was retired but not from life. Dave was there for Carol, for B and H (the neighbors), for the friends across the street. Dave was there for anyone and everyone. He worked hard and loved greatly. Dave will be missed in the spring, summer, fall and winter, but mostly he'll just be missed. I used the glitter pen on the leaves on the tree, on the stitching, on the flowers, on the home made dew drops because that's where Dave's light will be for all to remember him.


On the inside I used the stitching border twice in Soft Suede and Wasabi and sponged the edges in Wasabi only.

I will stamp a little something there and write a note to Carol.

RX
This is a sketch from 'I heart 2 stamp' by Jen del Mur. See the sketch below.
STAMPS: Thought and Prayers from SU, Stitching border from Waltzingmouse Stamps
PAPER: Soft Suede, Wasabi, Natural Ivory
INK: Soft Suede, Wild Wasabi
HARDWARE: Charm from Club Scrap
INCIDENTALS: ribbon from SU, DMC, buttons, home made dew drops, primas
TOOLS: spellbinders label two, slot punch


My tree was on the big side, so, of course, is the circle, soooooo...I had to improvise a little. Hope it passes muster!! I  love the stitching border stamp from Waltzing mouse stamps. Her button is on the right sidebar. I know that I have told you before....Claire's stamps are terrific. They are clear and you can see exactly where to apply your image. Stop by and see her blog, too!
Thanks for coming by!

Monday, December 21, 2009

Four days left to shop....NOT

I am not much of a shopper and Christmas is no exception. I do go out and shop, don't get me wrong. I don't have people go out and shop for me, that would be my husband's style. He gets the DDs to do his shopping for him. However, he did go shop one evening with L and got all his shopping done. In one evening he managed to take them out to dinner (L and her two dds), shop, and be home before 8:30 pm last Monday, the 14th of December. I start planning around August and pick things up here and there, shop online and barely manage to get done by December 24th. LOL!! Truly, I don't like to shop too close to Christmas because there are too many people out there in a panic to get their shopping done at the last minute and it just unnerves me. From the traffic, to parking, to crowded aisles, to limited choices-- it's a madhouse and I want to be home secluded and safe wrapping all the stuff I bought over the months, slowly and methodically! Not to mention the three birthdays that fall within four days of Christmas. Here's DH's secret--he only has to buy for me!!! I do all the shopping for the children and the grandchildren. He just has to buy for me!!!


The card today is another card camp creation. It's 5 1/4 inch square. The DSP is Holiday Lounge with Sahara Sand and Ruby Red, and white. All elements are Stampin' Up!

And the inside is plain white.....NOT!!!!!
 
We used the SU Sizzix tree die. It was hard to figure at first and yes it is just plain white. Isn't it beautiful with just a star on top? And the red tree skirt? The die had to be passed through the big shot 2-3 times to get all the parts that were needed to build the tree. It was so worth it!!!! The paper had been embossed before we cut out the tree.

Thanks for stopping by!

Sunday, December 20, 2009

Card camp

I made this at a card camp last month. I wanted this stamp set, my sister was going to get it for me for Christmas, but she forgot!! OR--maybe she didn't and said she did!!! Today everything is from SU.

The DSP is Holiday Lounge and the name of the ss is on the tip of my tongue, it's in the mini catalog, 'Wandering Words". the other papers are gray and Taken with Teal, and white. oh, and the snowflakes are from a hostess set called Christmas Punch. The inside is just white sponged with the Teal.
It's later than I normally post, but I was busy shopping for and making dinner and prepping for the wee little birthday party here tonight
.
My oldest brother Bill is coming for dinner. I am making him all of his favorites-- meatloaf, garlic mashed potatoes, brussel sprouts, broccoli, sweet corn, crescent rolls and he was going to get a diabetic dessert...but he said he was saving up and had no suger for the last four days and was definitely expecting a chocolate treat. So I made a cola cake. the recipe is a little different than what  I usually do. When the batter is all mixed you fold in 1 1/2 cups of mini marshmallows and then bake, leaving sweet little pockets when it bakes. How does that sound? Oh, the frosting, I changed that up a little by adding toasted pecans and toasted coconut before I poured it on the 'hot, richly smell of cocoa and butter and sugar' cake.
do you think my brother thinks I am trying to kill him?
At least he's getting his daily intake of fiber in the veggies!!!

PS.  DH just got a call and he has to go to work! He put the meatloaf in the oven before he left and I said, "What about the appetizer?" He said, "What about it?" I said, "Don't you want me to save you some?"  "OH, yea, sure I'll definitely want some of that when I get home," he said!!
I made his absolutely newest, bestest app--Spinach and artichoke dip. It is so easy to throw together and I needed to make something that he really likes, too!! Don't want to make him jealous...LOL!!
Thanks for coming by!


Saturday, December 19, 2009

A fast thank you card

Made the bow and then needed a card. This paper was used previously for a birthday card and Lily was playing with the green background paper. She crumpled up one piece but I managed to salvage this
4" x 5 1/4" for this card. It's going to be hand delivered so I'll make an envelope box and deliver it myself....CHEAP! Yea, that's me.

This was so simple. The hardest part was picking out the stamps to use. 'Yummy' is the borders, I only inked up part of that stamp, and 'Think Big' is the thanks. A large glue dot was used to attach the bow. My Mother taught me how to make those bows when I was but a wee thing and have been making them ever since. Found the strand of white beads at a LSS and just sort of tied them on.

Friday, December 18, 2009

Boxes and cards

I needed two sets so I used the same paper and just did a little switcheroo here and there.
 
I like the ribbon handles so much better than the paper. It's softer and easier to carry. Each purse carries four cards with envelopes. You can get more in there. I just prefer the four. Below the purses are a couple of shots with one open .


and then, of course, the cards. One set is sponged using the Moonlight White and the other does not. I used the Sakura gold pen to 'light ' the candles and they look great IRL. My SIL received the sponged one while my hair styllist will get the other on Monday when I get my hair cut---woo hoo, it needs it.


RX
STAMPS: Dollar sentiment and chandelier from Mike's stamped in gray.
PAPER: Vintage Violet, Lovely Lilac, White, DSP DCWV stack
INK: Basic Gray, Brilliance Moonlight White
TOOLS: Eyelet border punch, scorer, Cuttlebug efs- Swiss Dots and Birthday Wishes
INCIDENTALS: Ribbon, brads


Thanks for coming by!

Thursday, December 17, 2009

Not your typical Christmas colors

This was quick and easy.

I was out trying to return a cutting blade to Joann. Wrong store--I bought it at Mike's. Off to Mike's and they had a dollar bin of all kinds of stamps. I bought 6, six, seis, and a few stocking stuffers for DGDs. This snowman was in my bag this morning just begging to be inked. The CC249 challenge was Mellow Moss,  So Saffron, Melon mambo (Rose Red) and a neutral. got out the circle nesties, the cuttlebug, a generic shimmer, ribbon and we were good to go. The snowman and I had a great time stampin, spongin', and laughin'. Cuttle bug folder--Spots and Dots, Snowflake, Swiss Dots. the nesties were from the large and small circle sets.
I asked Santa for some Waltzingmouse sets and the new labels four and five from I heart Papers. Let's see who's been good or bad!!!
I got off the subject there for a sec. the snowflake is Sizzix with a bling in the middle. I have had a particular stamp pad for years and it always seems to ink up real well. It's Brilliance Moonlight White and i used it to sponge the edges and the embossing. I colored my buddies hat and used a black marker for his dots. OOps! Almost forgot, the Sakura glitter pen to highlight and tickle all my buddies Swiss dots that were outside his body.

thanks for coming by!

Wednesday, December 16, 2009

Beanie gift card holders

SCS is amazing. If you haven't been GO NOW! You do not need to be a member. Go to search, type in beanie and hit go. all the beanies in one place. A beanie convention! No two are alike, it's amazing what people can do with their beanies.
Season's Greetings before and after:
Then a non Christmas card before and after:


The original, to the best of my knowledge is here.  Scroll down a bit when you get there
and you'll see a video.
If your computer is video challenged here:
One circle 5 inches, cut in half. One strip of cs 5 1/8 x 1 5/8, cut/punch border.
decorate as you wish. Take one half circle and apply red tape or equivalent close to the flat edge and apply to strip close to the border edge. Punch hole near far left side. Apply eyelet ( don't press too tightly, you want your paper to move) or brad to let the top circle move freely, like a Pacman--open close, open close. On the blue one I used a piece of coordinating ribbon and tied it after passing it through the holes. You can see it hanging out the left side. On SCS and Hope's blog you can see the gift card on the inside. how cool is this for a gift card holder!
My blue card will not be a gift card holder, but i made it just like it was. It's a wannabe card holder. It can still go to the convention!

Thanks for coming by! Leave a comment or be a follower and join in all the fun.

Tuesday, December 15, 2009

Caddy for a friend

this was so easy, took time to glue it all down, but it was so worth it. found this
over here at Hope's blog.
Two views, one so you could see the bottom.
You will need one heavy pc of cs and two pcs of DSP, eight eyelets, that do not need to match, one or two pcs of 12 inch ribbon, a scorer of some sort,  adhesive (I use Tombow glue, 'Aqua' in the clear and blue bottle.
1. Score the heavy pc of cs at 4" and 8", turn it one quarter and score the same--4" and 8".
2. Score all four corners from the outside to the first intersection.
3. Fold on all lines.
4. Cut the first pc of DSP 3 7/8 x 3 7/8,  that will go in the inside bottom of your caddy. Attach with
                      adhesive of your choice.
     Then cut eight   3 3/4 x 3 3/4 squares and cut them in half diagonally for 16 triangles. Glue to
                      triangles on caddy, inside and outside.    
5. Cut the second pc of DSP into squares 3 7/8 x 3 7/8. Attach all eight of those squares to the caddy.
           MY DSP WAS TWO SIDED SO I INTERCHANGED ALL FOUR DESIGNS.
6. Fold the four corners in forming the caddy. those four corners hold eight triangles. Punch holes in all
                     eight  triangles near the corners. These will hold the ribbon. I used a cropadile, but you
                     could use a Japanese screw punch, or a 1/8 hole punch.
7. Run 12 inches of ribbon through the eyelets, pull and tie the ribbon in a bow, or knot if you like.
8. Take another 12" ribbon and put it under the previous ribbon and tie a knot at the two ends.
                     You now have a loop to carry/tote the caddy.

this week i will be making 9 inch caddies using 2 pieces of not quite heavy paper with only one design on each  sheet, then glue them together. Will let you know how that works out. DD wants to use them as gift holders (cookies) for all the peeps at her work. smaller boxes, less paper, ...hmmmmm. And last minute! i work better under pressure.
Enjoy your caddies, this was fun and pretty quick.
FYI! I use practice paper on all my first tries. You could use copy paper and cut a square 6 x 6, score at 2 and 4 and give that a try for practice of the scoring and folding. I'm just sayin'!!
Or go full speed and give it a go!!!!
Thanks for coming by!

Monday, December 14, 2009

Jesus is the reason for the season

I needed two quick cards for an early gift exchange with good friends, the best friends! this seemed to fit the description. The challenge stated that it had to have a star, ribbon, and few layers, if any, znd a pop up. The insides were going to be a little complicated so easy on the front was a necessity!

That was as easy as easy can get. Here is the second one and following is the inside credit/gift card holder.
I made my own 'credit cards'.

Then the holder-------bad picture...duh!!

the gift card-----


And a close up of the numbers


first, the manger card: kraft and Cranberry Crisp paper. the manger is from SU All God's children set, that I colored with marker's to avoid the heart and saying. then AI used the aqua painter to get some glow around Jesus. paper pierced and added the Quickutz sttar from the nativity set. Border punch for the ribbon. And popped up with SU recycled foam, the star and image.

Second, the Waltzingmouse stamp-- inked up the bird and stamped five times to get a star using Brilliant Blue on natural Ivory. papers are SU Brilliant Blue and Kraft. Used the top note from SU and cut it into thirds and mounted it after sponging.. Tied the ribbon in knots, secured and popped up the star.

third, the inside card holder I found on a blog or site and for the life of me can not remember where. If any one can tell me, please do, so I can give the credit and track back. I took Kraft and cut 5 x 10, scored at 4, 5, 6 inches and mountain and valley folded. Pinched with 1" circle in the middle and then used the word punch to elongate the holder part. Placed adhesive carefully so as not to interfere with the card positioning. I then sponged with BB all over the edges, and stamped the bird several times, once with the wee bird inside the larger one. Wasn't that a great idea that Claire had over at Waltzingmouse stamps?

fourth, I just love my credit cards. Cut each piece  2 1/8 x 3 3/8 and used my smallest corner rounder to make it look like a credit card. Stamped one side using a mask (small oval punch and copy paper) with French Script using Soft Suede, then Just Rite Horizontal stamper to create the center. Just rite, also, to do the numbers in Versamark and then silver EP.
The other side was stamped and masked (word punch and copy paper) with the canvas using Soft Sky
Just rite, again, for my blog name and lines underneath.
the cards entitles the bearer to special benefits, like coming over and creating cards, or boxes, or caddies(later this week),or card purses, etc.

Thanks for coming by!
ED: M and J wanted to use their 'credit cards' ASAP.  after the first of the year we will get together and let our hearts and hands create!

Sunday, December 13, 2009

Most useless email of the day number one

I have a family member who sends me useless emails every once in  a while and I aim to share them with you.

Pogonophobia is the fear of beards.

Cindy H inspiration

Was lurking and stalking over at SCS when I came upon this card.  I graciously told her that I would be copying her card and would track back to her.

As a clean and simple challenge (CAS) it intrigued me. I found this paper that already had a horizontal element so CAS became easier-less to think about and plan for here. Went through my stash of everything pink and that shade of green and you're looking at what I came up with.

RX
Paper: Colorbok's Vintage Wallpaper, Pink pirouette, Pretty in Pink
Ink: Old Olive, sponged; Pink passion sponged on flowers
Incidentals: Sizzix's Hello Kitty Flowers die; various and sundry buttons, twine


Thanks for coming by!

Saturday, December 12, 2009

Sisterhood of the Blogging Stampers #29

Hey! I am just so excited to be able to be a part of SBS#29! This will be the best thing to get to know other bloggers that love to do what I do----CREATE. I can't wait to meet them. I have seen some of the blogs, but not all, YET!
I have been stamping for about 5 years, but only recently got serious about it. I make a card or project every day and post it on my blog, obviously!
So, leave a comment and off we go! I need to learn how to add my new sisters' names on the side bar.
I won't be back to tell you I can't. You'll just have to see!
DID IT! Scroll down

Bath and Body

ED: the girls got their B an B soap and the boxes. They loved them.

Well, I bought all these and more at the huge sale in the fall thinking ahead to Christmas and all the female members of the family that I usually gift some thing home made. Now that I am paper crafting they get paper crafts. Makes sense.

Little did I know that my little 'point and shoot' would catch one of the bottles with some used. Maybe I'll just keep the pesty thing that uses so many AA batteries!
Are you ready? Here's what I came up with after many tries using all sorts of paper! Keep in mind that I did not want them to be decorated for the Holiday! The girls will get them on Christmas and may want to use them for something else. Two of my dear friends will get these this Saturday so this will post on that day.


So easy! I used 12 x 12 paper, but 8 1/2 x 11 will work. Score at  2 1/5, 5, 7 1/2, 10. Turn one quarter and score at 2 1/2. the sample below is an 8 1/2 x 11 and this box will be 6 inches tall. 12 x 12 will give you a box that's 9 1/2 inches tall, or you can it it down. I cut mine to be 8 inches tall. This sample is an 8 1/2 x 11.

I used Club Scrap paper from a kit, 'Steppin' Out' from long ago. The dark blue sheet had the same pics as the lighter one, but no writing on it, so I used the coordinating stamp and stamped in SU silver. I sponged the edges of both boxes to give it a little extra dimension. both boxes got border punched, one with the slits to weave ribbon through from Fiskars and the other with a flowery edge (Fiskar,s too). The names escape me, but you get the drift. Use whatever border floats your boat. The lavender ribbon is wired and the silver is not both are from Jo's. I found a hat pin in the BOTD and finished off the white/silver bow by punching two small round holes at an angel to each other. the hat pin actually holds the bow on to the box.
If you wanted to put a top on your box, it's easy.
1. Your box measures 2 1/2 x 2 1/2.
          the math add 1/8 inch to your box top 2 5/8 x 2 5/8
2. How tall/deep do you want your lid
           let's say you want the lid to be 1 inch deep
          the math-the size of your lid plus one inch each side
          2 5/8 plus one, plus one
3. Cut your box top paper 4 5/8 x 4 5/8
4. Score your piece of paper one inch on all four sides.
5. Cut once on each fold from edge to next fold/score line-corners only. Pic below.
      Alternate: score on the diagonal the small corner pieces and fold them in and tape. (second pic)

The score and cut pic above shows folds in the corners, cuz I used the same sheet to do both. I took separate pics, but the card wasn't in the camera so I had to shoot over again, and the folds were there the second time. Clear as mud, right?
 
Some times a thicker stronger lid is needed:
1.  Add 2 inches to your lid
         2 5/8 plus one, plus one, plus one plus one
         6 5/8 square and score at one and two inches on each side. Pic below
2.  Fold in twice for sturdier lid if needed

In the pic above the black lines are cut, then I cut them out so you could see better. Still mud?
I prefer my four tucked in edges cut a particular way so that each pair is on the same side, easier to handle, fold, tuck. Fold all your lines and make the box, then come back and tape then fold again. That way if any adjustments need to be made they can be done before the tape takes you to the land of no return. My tape is not "forgiving" and once down it's done!!!
After you make a box and lid or two you'll "get" it and be off on your own making envies, boxes, etc. All you will need is the card or item that you want to "box."
I will not post an RX today as I explained as I went.
This was so much fun, even if it did take a while with all the retakes, etc.
For some of you this is very elementary. I do have some blogger friends that are new to this and ask for beginner tutorials. So, you advanced peeps, check out the goods and just skip over the easy peasy.
I'll be making more and I'll take one pic of them all next week.
I was just over at SCS and Val had done a box. Go look at that and think lid using the measurements I gave you. I like that she says--cut a sliver off. That's perfect advice. Check it out here.

Thanks for coming by!

Friday, December 11, 2009

Another baby shower

DD needed another baby shower card for the same mom-to-be at work.

This came together very quickly. The CB was out as was all the paper. I knew I wanted to use the lattice and two were already cut out and waiting to be used. After fiddling with an idea I put the two together and intertwined them--very 3-D IRL. Since it was not going in the mail , I made my base 5 1/4 x 5 1/4  which was great  considering the lattice size. I glued it down and added some bling from the BOTD. I really did up the inside-so here it is---------

 I made an envelope from a 12 x 12, more like an envelope box. Gave it to DD before I realized that I should have taken a picture. Sorry. Next time.


RX
Stamps: Word on Word
Paper: Pretty in Pink, white, Club Scrap off white, DSP Whipper Snapper Designs
Ink: Pretty in Pink
Tools: Sizzix lattice from SU, Eyelet border punch
Incidentals: Pink bling from the bottom of the drawer

Thanks for coming by!

Thursday, December 10, 2009

Bells and Boxes

This started with a gift from my SIL, a stamp. I did not use the stamp but I used the idea behind it.


I made an explosion box to give the bell as a gift.
Here's the story.
Becky and Phyllis along with some other friends went to Colorado to have some girl time, shopping time, touristy time, etc. Bec and Phyl, on one of their excursions, happened across a stamp store. Inside a lady was painting a bell and they were excited with how the lady was painting her bell. They strolled, more like gawking, through the store and saw so many bells painted so beautifully. So many bells in several designs. Bec and Phyl decided that they needed to buy some bell stamps. The stamps were made right there on the premises according to one of the sales ladies. Phyllis bought one and Bec bought me one, stamps that is. They had the instructions with pictures right there from Holly Berry House Stamps. Becky called me when she got back from her trip and tried to explain the stamps, and the bells, and the lady painting, etc.
"Will you show Phyllis and I how to make these?", she said.  I made a few, had the girls over to stamp and make bells, but we had no paint that would work like Bec and Phyl explained.  I checked over at the HBH stamps on line and they used Twinkling H20's to paint their bells.  Well, I did not have TH20's so I scouted all the LSS's and no one had any. Someone told me that they went out of business in the beginning of the year and there would be no more TH20's. I bought some paints at J's, but was not happy with them. I went on line and looked up TH20's and found them. They had planned on going out of business, but changed their minds. (another story).  So,  I checked several online places and settled on buying the paints from the TH20's business. After 6 weeks, I called them. After eight weeks, I called them. Every day looking for the USPS to deliver my paint. Now, it's October and the window of opportunity is closing.  We wanted to paint our bells for Christmas. At last they arrived, we made dates for the girls to come over and paint our bells. In the eight weeks of waiting for the right paint I made this bell, not using the stamps, out of paper, of course, paper. Isn't that what we do? Create things from paper, just paper, no stamps this time. I made a template of the stamp and cut it out five times. Made a template for the inside and cut that, too. Sewed on the DSP  then sewed the five panels together.  I used SU's Holiday Thyme and Kiwi Kiss. The stamp on the box is SU's Filigree using Cranberry Crisp.. On one flap I stamped a Christmas tree and a sentiment.  This is my favorite bell so far. Meanwhile, I have twenty jars of TH20's to use. We did paint a few, then time ran out. We will plan on this project for next Christmas.

ED: In Th20's defense, they only had two employees and said they were slow getting the orders out. I placed my order on August 30th. They are gorgeous paints and I am glad that I own them.

Thanks for coming by!

the tall boxes

The tall boxes that I made will not be posted until Saturday as that is the day my friends will receive them. I don't want to spoil their surprise!  I can't even show you the picture of what is going inside them until Saturday.
Have a great day, scroll down, make a few comments. Just relax and wait as all good things come to those who wait!!
Thanks for coming by!

                                                                       WAIT!
Aw shucks, I gotta give you something! My post for Sunday was Bells. Here, I'll release it now and you can have some eye candy. You are gonna love this! It will release in four minutes. Wait....wait.....wait....

Wednesday, December 9, 2009

Pink is...............

for the baby shower. Here is the card that all the employees will sign. I made ten pages for signatures. The card/book is 5 1/2 x 3 1/2 and I made a #10 envelope to fit.

This was quick and easier than it looks. Take 7 pieces of cardstock 5 1/2 x 3 1/2 and score all but one at one-half inch on the short side. Using 2 coordinating DSP cut 12 pieces 5 x 3 1/4 inches and apply to the front and back of 5 'pages'. the front should have one pc DSP on the back of it. The last 'page' should have one pc of DSP on the front of it. Stamp and decorate. The last 'page' should be the one that is not scored. Cut one piece 1/2 x 3 1/2 to add to the front behind the ribbon on the left. stamp if desired. I used my cropodile to punch small holes through all thicknesses and  ran ribbon through holes to hold the pages together. The front white I cut 3 1/4 and punched the border then cut it to the desired length. My daughter liked the book/card and took it home Monday night to have it for her work in the morning.


RX
Stamps: Punches Three, Friends 24-7, and various stamps that were baby related
Paper: Pixie Pink, Candy DSP retired SU, Certainly Celery, White
INK: Pixie Pink, Certainly Celery, So Saffron, Rose Red
Ribbon: Certainly Celery 1/4 inch, Pink 5/8 both SU
Tools: Eyelet border punch, cropodile

Thanks for coming by!

Tuesday, December 8, 2009

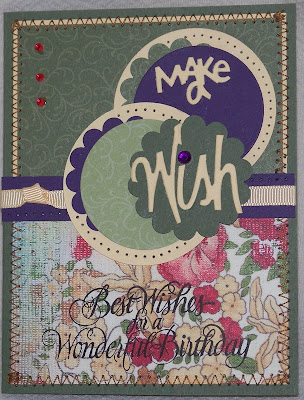
Make A Wish

 Woo-hoo another post for December 8th.
DD needed another bday card.
First the front and then the inside.
Scroll down to see the changes that were made.


I added a fancy Happy Birthday in black on the front and a label 2 from Spellbinders for the inside for DD to leave a personal sentiment, per her request.
This card represents two challenges-Mojo116 and CC248

RX
Stamps:  Birthday Greetings
Paper:  CTMH, Daisy D's, SU artichoke, bananas, eggplant
Ink:  Riding Hood Red
Punches: Curly label, Scallop circle
Dies: Nesties circles, CB Birthday wishes

Here are the changes-
 
What a difference. I knew it needed something, so back to the station!! How do you like it now?
Punched some holes-learning how to do that on a circle using my mat pack. I need practice. Of course, it might have been easier and nicer had I punched before I put the card together! Added the sentiment which BTW looks better IRL. Finally, the little red rhinestones from Heidi Swapp.

I'm working on three cards-same colors, masculine, different theme!
Stay tuned, I'll post 'em this week.

Thanks for coming by!

Related Posts with Thumbnails